Getting Started
This chapter provides instructions on how to get started with ChemApp for Python. This includes downloading the required software, installing it, and confirming that the installation was successful.
There are a number of ways to install Python in preparation for using ChemApp for Python. These include doing a bare Python installation, installing Anaconda, and using Python virtual environments. The procedures for installing ChemApp for Python through these methods on both Windows and Linux are provided in this section.
We strongly recommend that you use Anaconda and Pycharm or Visual Studio Code when starting out working with ChemApp for Python. These tools make the initial learning curve just a little bit easier, more user friendly, and quicker.
The following components must be installed:
Anaconda Python distribution
PyCharm Community IDE / Microsoft VSCode
ChemApp for Python package
Note: The order of the installation is important, and should be done as shown in the list above.
Get the Installation Files
Anaconda
You can download Anaconda for Windows, and Anaconda for Linux. Make sure that you download a 64-bit version.
PyCharm Community
You can download PyCharm Community for Windows, and PyCharm Community for Linux. It is not necessary to download the PyCharm Professional distribution. It is a matter of taste whether you prefer PyCharm or VSCode.
Visual Studio Code
You can download Visual Studio Code. It is a very modular and flexible editor with great Python integration. It is a matter of taste whether you prefer PyCharm or VSCode.
ChemApp for Python
The ChemApp for Python package is distributed as a .tar.gz archive or
.whl wheel with a name such as chemapp836.0.1-win-chemapp8.3.6-py3.12.7.tar.gz/.whl. The file
must be obtained directly from GTT Technologies. It is not available by any
other means.
The distribution file name indicates the version of ChemApp for Python itself, the operating system it is intended for (Windows or Linux), the version of ChemApp that it contains, and the version of Python that is must be used with.
Installing Software
ChemApp for Python with Anaconda
Windows
To complete this procedure, you will require Administrator privileges on your computer. To install Anaconda, Python and ChemApp for Python on a Windows computer, follow these steps:
Optional: Install Anaconda or Miniconda. The only difference between Anaconda and Miniconda is that Miniconda requires to dynamically download more packages compared to Anaconda, while Anaconda is a (much) heavier initial download. The steps below describe the installation of Anaconda, but work identically with Miniconda.
Once you have the installer file, named something like
Anaconda3-2025.06-0-Windows-x86_64.exe, you can simply double-click on it to start the installation, and follow the prompts to complete it.Note: The Anaconda installation uses
C:\Users\user_name\Anaconda3as installation destination by default. If theuser_namecontains spaces, e.g.C:\Users\John Doe\Anaconda3it can cause causes problems when using Anaconda. It is therefore recommended that Anaconda is installed directly onto a drive at, for example,C:\Anaconda3,D:\Anaconda3. This ensures that the path contains no spaces.Also, both advanced options must be selected on the final installation prompt, as shown in the figure below. This is very important, since the
condacommands in the terminal will not work otherwise.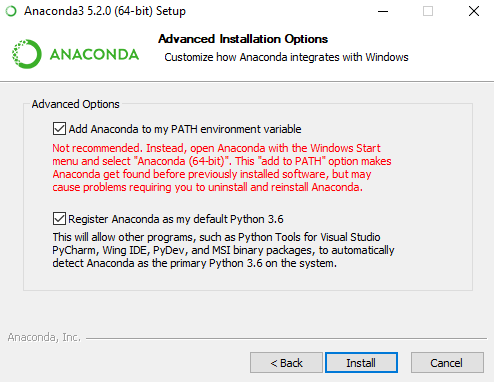
Note: If this is your first installation of Anaconda, you may need to set up the Anaconda shell integration. To do this, open the Windows command prompt by pressing
Windows-R(hold down the Windows key and pressR), typingcmd, and pressingEnter. Now type the following on the command prompt and pressEnter:conda init
Close the command prompt, and open a new one to ensure that the changes take effect, which will be indicatesd by the prompt starting with
(base).Install development environment. You can choose either PyCharm or Visual Studio Code (VSCode), or both/neither.
Install PyCharm.
Once you have the installer file, named something like
pycharm-community-2021.3.1.exe, you can simply double-click to start the installation, and follow the prompts to complete it.Note: It is important to select the 64 bit installer, and select.pywhen asked about “create associations”, seen in the figure below.Install VSCode.
Once you have the installer file, named something like
VSCodeUserSetup-x64-1.64.2.exe, you can simply double-click to start the installation, and follow the prompts to complete it.
Create a
condaenvironment. This step is not strictly necessary, but recommended and important to avoid conflicts between packages. You may also useuvor any other tool to create a virtual environment, but the steps below describe the use ofconda.Open the Windows command prompt by pressing
Windows-R(hold down the Windows key and pressR), typingcmd, and pressingEnter. Now type the following on the command prompt and pressEnter:conda create --name my-chemapp-env python=3.12.7
When prompted to install default packages, type
yesand pressEnter. You can choose your own name instead ofmy-chemapp-env.Great! Now you have a Python environment in which you can use ChemApp for Python. Keep the Windows command prompt open for the next steps.
Activate the
condaenvironment.Now you need to activate your new
condaenvironment so that you can work inside it. Type the following in the command prompt and pressEnter:activate my-chemapp-env
Now you are ready to install ChemApp for Python!
Install ChemApp for Python.
In the command prompt, change into the directory that contains the ChemApp for Python distribution package. Let’s assume it is located in
D:\temp. Type the following, ending each line by pressingEnter. You can ignore the lines that start withREM. These are just comments that explain what the commands do.REM Change current drive to 'D:'. D: REM This changes the current directory to 'D:\temp'. cd D:\temp REM install chemapp. pip install chemapp836.0.1-win-chemapp8.3.6-py3.12.7.whl
The name of the
.tar.gzor.whlfile must correspond to your distribution package file name.Confirm successful installation in the
condaenvironment.To confirm that ChemApp for Python is now available in the
condaenvironment, type the following in the command prompt and pressEnter:conda list
This should return a list of installed packages, with
chemappas one of them, with the version number corresponding with the version number of your ChemApp for Python distribution file, as follows:# packages in environment at C:\Users\user\Anaconda3\envs\my-chemapp-env: # certifi 2018.4.16 py36_0 chemapp 836.0.1 <pip> pip 10.0.1 py36_0 pymongo 3.7.0 <pip> python 3.12.7 h09676a0_15 setuptools 39.2.0 py36_0 vc 14 h0510ff6_3 vs2015_runtime 14.0.25123 3 wheel 0.31.1 py36_0 wincertstore 0.2 py36h7fe50ca_0
Linux
To complete this procedure, you will require root privileges on your computer. To install Anaconda, PyCharm and ChemApp for Python on a Linux computer, follow these steps:
Install Anaconda.
Once you have the installer file, named something like
Anaconda3-5.2.0-Linux-x86_64.sh, you need to change file permissions to allow execution. Open a console, and change into the directory where the installer file is located (in our case~/Downloads).cd ~/Downloads # change directory chmod +x Anaconda3-5.2.0-Linux-x86_64.sh # allow execution ./Anaconda3-5.2.0-Linux-x86_64.sh # install anaconda
Complete the installation by answering the questions posed by the installer. You should be able to safely accept the default values.
Install PyCharm.
Once you have the installer file, named something like
pycharm-community-2021.3.1.tar.gz, you can simply extract it into yourhomedirectory (~). For further instructions, please refer to theInstall-Linux-tar.txtfile in the root of the directory into which you extracted the installer.Create
condaenvironment.Type the following in the console:
conda create --name my-chemapp-env python=3.12.7
You can choose your own name instead of
my-chemapp-env.Great! Now you have a Python environment in which you can use ChemApp for Python. Keep the Linux command prompt open for the next steps.
Activate the
condaenvironment.Now you need to activate your new
condaenvironment so that you can work inside it. Type the following on the command prompt and pressEnter:source activate my-chemapp-env
Now you are inside your new
condaenvironment, ready to install ChemApp for Python!Install the
libgfortran3library.ChemApp is dependent on this library on Linux machines. Use the following command:
sudo apt install libgfortran3
Install ChemApp for Python.
In the command prompt, change into the directory that contains the ChemApp for Python distribution package. Let’s assume it is located in
~/Downloads. Type the following, ending each line by pressingEnter:# change directory cd ~/Downloads # install chemapp pip install chemapp836.0.1-linux-chemapp8.3.6-python3.12.7.tar.gz/.whl
The name of the
.tar.gzor.whlfile must correspond to your distribution package file name.Confirm successful installation in the
condaenvironment.To confirm that ChemApp for Python is now available in the
condaenvironment, type the following in the command prompt and pressEnter:conda listThis should return a list of installed packages, with
chemappas one of them, with the version number corresponding with the version number of your ChemApp for Python distribution file, as follows:# packages in environment at C:\Users\user\Anaconda3\envs\my-chemapp-env: # certifi 2018.4.16 py36_0 chemapp 836.0.1 <pip> pip 10.0.1 py36_0 pymongo 3.7.0 <pip> python 3.12.7 h09676a0_15 setuptools 39.2.0 py36_0 vc 14 h0510ff6_3 vs2015_runtime 14.0.25123 3 wheel 0.31.1 py36_0 wincertstore 0.2 py36h7fe50ca_0
ChemApp for Python with a Bare Python Installation
This procedure explains how to install ChemApp for Python into a bare Python installation.
Windows
Download the relevant version of Python. For the current ChemApp for Python version, you need to download Python 3.13.2..
Install Python.
Double-click on the downloaded
python-3.13.2-amd64file. In the installation window, tick the “Add Python 3.13 to PATH” and choose customise installation and click next. On the Optional Features window, make sure that all of the checkboxes are ticked and as seen in the Figure below, and click next.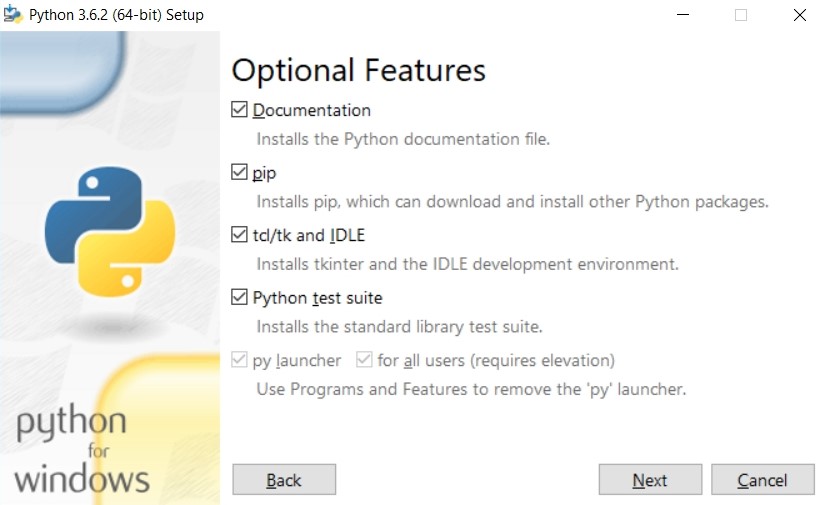
On the Advanced Options window seen in the Figure below, click on the “Install for all users” checkbox. This will change the install directory to
C:\Program Files\Python313. This should be changed toC:\Python313for simplification purposes.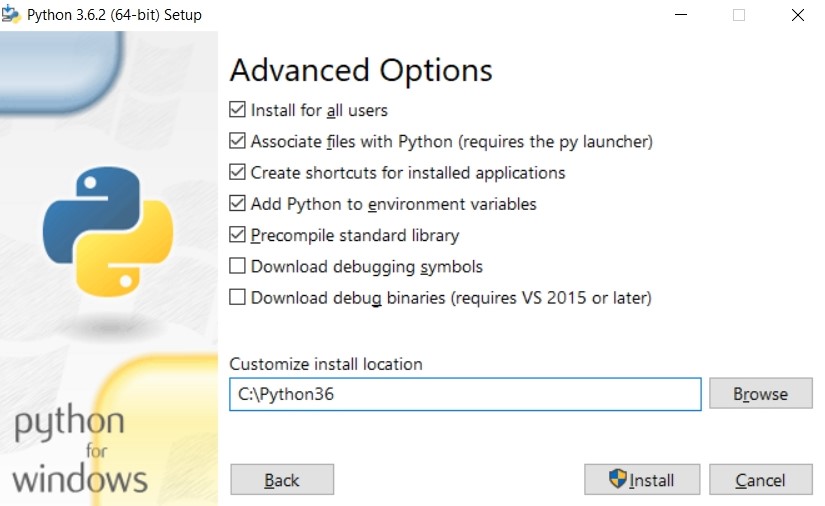
After the installation, the window can be closed.
Additional installations.
To be able to install the ChemApp for Python package,
setuptoolsandpip(a Python package manager) must be installed. These are installed by entering the following commands into theCommand Prompt. The command prompt can be opened by pressingWindows-R(hold down the Windows key and pressR), typingcmd, and pressingEnter.install pip:
curl https://bootstrap.pypa.io/get-pip.py | pythoninstall setuptools:
pip install setuptools
If you are unsuccessful with the installation, a more detailed procedure can be found here. Or consider to switch to one of the IDE installation methods.
Install new packages using
pip.In the command prompt, new packages can be installed with the following command:
pip install <new-package>. Try it out by installing the numpy package:pip install numpy
Display packages installed on Python.
The following command can be used to see the packages installed on Python.
pip list
Download ChemApp for Python’s free Light edition.
ChemApp for Python Light can be downloaded from the GTT website. The dowloaded file should be stored in an easily accessible location. In this example, the file is downloaded to
C:\Python313\Scripts\python-packages\
The “python-packages” folder was created manually.
Install ChemApp for Python Light.
In the command prompt, type-in the following command to install ChemApp for Python Light
pip install C:\Python313\Scripts\python-packages\chemapplight-836.0.1-win-chemapp8.3.6-py3.12.7.tar.gz/.whl
The name of the downloaded file could differ depending on the ChemApp for Python release version.
Open python.
Python can be opened by typing “python” in the command prompt. An alternative method is to press the
Windowsbutton, search for “python” and clicking on “Python 3.13 (64-bit)” under Apps.
Linux
The following procedure must be used to use ChemApp for Python in bare Python.
Install Python.
Install Python 3.13 through the terminal with the following command:
sudo apt-get install python3
Ensure that Python 3.13.2 is installed by downloading it here. Unzip the file, with a name like
Python-3.13.2.tgzin an easy to locate location. Thencdto thePython-3.13.2file in the terminal and run the following commands:sudo make
And,
sudo make install
Verify that Python 3.13.2 was installed correctly by executing the following command:
python3 -V
Install ChemApp for Python.
For this installation it is required to have obtained the ChemApp for Python
*.tar.gzfile.cdto where the ChemApp for Python package is stored and install ChemApp for Python through the terminal with the following command:pip install chemapp-836.0.1-linux-chemapp8.3.6-py3.12.7.tar.gz/.whl
Ensure that ChemApp for Python installed successfully by running the following command in the terminal:
pip list
A list of all the installed packages will appear. Below is an example of the list showing that
chemappis installed.certifi 2017.7.27.1 cffi 1.10.0 chardet 3.0.4 chemapp 836.0.1 click 6.7 cloudpickle 0.4.0 clyent 1.2.2 colorama 0.3.9
Running a Python file.
In order to run a
*.pyfile run the command, shown below, in therminal. Thefile_pathto the*.pyfile must be entered correctly in the terminal.python file_path/*.py
ChemApp for Python with Python virtualenv
The following procedures were written for Windows and Linux users that prefer using Python virtual environments without the use of an IDE.
Windows
Download Python and Pip.
Download and install Python as explained in the “ChemApp for Python with a Bare Python Installation” section. Also complete the “Additional installations” mentioned in this section to install “pip” and “setuptools”.
Make a virtual environment.
A step-by-step guide on creating a virtual environment can be found here. In this example, we will name our virtual environment “chemapp-light”.
Download ChemApp for Python’s free Light edition.
Download and install ChemApp for Python Light as explained in the “Installing ChemApp for Python on Bare Python” section. In this example, ChemApp for Python was downloaded to
C:\Python\Scripts\python-packages\
Install ChemApp for Python in a virtual environment.
Activate the newly created virtual environment with the following command:
.\chemapp-light\Scripts\activate
ChemApp for Python can now be installed using
pip install C:\Python\Scripts\python-packages\``chemapp836.0.1-win-chemapp8.3.6-python3.12.7.tar.gz``'
pip listcan be used to ensure that thechemapppackage was successfully installed.
Linux
The procedure for installing ChemApp for Python on Linux using a Python virtual environment is as follows:
Install
virtualenv.In the terminal, run the following installation command:
pip install virtualenv
Add a new virtual environment.
Once the
virtualenvinstalltion is completed it is required to create a virtual environment. The name of the virtual environment is determined by the user, for simplicity,my-chemapp-envis used to name the environment. The environment can be created in any directory with its specificfile_path.virtualenv file_path/my-chemapp-env
It is not necessary to add a
file_path, then by default, the virtual environment will be created in the/homedirectory.Activate the virtual environment.
To activate the virtual environment run the following command in the terminal.
source file_path/my-chemapp-env/bin/activate
Once the virtual environment is active, the name of the virtual environment will be displayed in closed brackets on the left-hand side of the terminal command line, e.g.
(my-chemapp-env). To deactivate the environment simply rundeactivatein the terminal command line.Install the Python version.
To install the correct Python version type the following command in the terminal with the virtual environment active:
virtualenv --download python3.9.1
Install ChemApp for Python.
ChemApp for Python Light can be downloaded from the GTT Technologies website for the Linux version. You will need to
cd file_pathto the directory where the ChemApp for Python distribution package is stored. Install the ChemApp for Python package with the following command in the terminal:pip install ``chemapp836.0.1-linux-chemapp8.3.6-python3.12.7.tar.gz``
Importing ChemApp for Python Components
If you want to use ChemApp for Python in one of your Python modules, you need to import its components in the same way that any other Python package’s components are imported. For example, you can import the different modules as follows:
from chemapp import core
from chemapp import basic
from chemapp import friendly
You can also use short aliases, if the names are too long.
from chemapp import core as cac
from chemapp import basic as cab
from chemapp import friendly as caf
Doing this depends on your preferences and coding style.
Getting Help
You can use Python’s help infrastructure to get more information on any of ChemApp for Python’s components. You can do this in the Windows command prompt or Linux console, outside the Python interpreter by typing the following:
pydoc chemapp
This will yield the following result:
Help on package chemapp:

NAME
    chemapp - ChemApp for Python.

DESCRIPTION
    The purpose of this package is to make ChemApp thermochemical
    calculations available through a set of easy-to-use Python
    modules and classes. ChemApp is developed by GTT Technologies.
    For more information, please refer to the following web page:
    http://www.gtt-technologies.de/chemapp

    Python version:  3.12.7
    ChemApp version: 836.0.1

PACKAGE CONTENTS
 basic
 core
 friendly

DATA
    __copyright__ = 'Copyright 2021-2023, GTT Technologies GmbH'
    __email__ = 'info@gtt-technologies.de'
    __maintainer__ = 'GTT Technologies'
    __status__ = 'Production'

VERSION
    8.3.6

AUTHOR
    GTT Technologies
To exit the documentation viewer, press Shift+q in Windows, and q in
Linux. Here are a few more examples of how you can use pydoc to get help.
# get help about the 'core' module
pydoc chemapp.core

# get help about the 'basic' module
pydoc chemapp.basic

# get help about the 'friendly' module
pydoc chemapp.friendly

# help about the 'tqce' function.
pydoc chemapp.basic.tqce
All the help information that you are able to access in this way is also available in the pdf documentation that is included with the ChemApp for Python distribution package.